Notes on Batch Scanning Film
Strips
Since the MF Film
Holdersä
allow you to scan multiple frames from a single film strip, you can set your
scanner software up to scan multiple frames as a single task.
This is a real a time, hassle and cost saving feature
which means the MF Film Holderä
will pay for itself many times over!!
Each user will have to
perfect their own scanning “workflow,” but here are some tips to get you
started. If you have questions which are not answered here, please consult your
scanner software’s manual/help file.
**Please Note - If terms
like dpi & ppi, white point, black point, histograms and curve functions are
“foreign terms” to you, you should really read up on scanning basics
at the wonderful ScanTips website:
www.scantips.com
Go directly to tips for:
EpsonScan Twain Software
Silverfast Ai and SE
VueScan
EpsonScan Twain Software (ships with Epson® scanners)
I recommend this software
for novice users because this is the easiest software to set up for batch
scanning. I like the fact you can easily create an individual selection marquee
for each image on your film strip and then separately adjust the curves, color
balance, etc., for each image! Read the EpsonScan’s help file for complete
information, but here are the basics to get you started. These steps are based
on the Epson® 3200, 4870 and 4990 driver settings although the 2450,
3170 4180, 4490, V500/V600/700/750, etc., software options should be similar. These steps will work
either via the EpsonScan Photoshop plug-in or via EpsonScan by itself. If your
computer is “speed challenged” or doesn’t have much RAM memory, you may want to
scan outside of Photoshop via EpsonScan (with Photoshop closed) so that you can
scan directly to a file and thus conserve computer resources for better
performance.
- Start EpsonScan
- Enter into
Professional mode
- Correctly set your
normal parameters in the “Original,” “Destination,” and “Adjustment”
sections of the EpsonScan window
- Set the Preview
function to “Normal,” not “Thumbnail”!!! (click on the small arrow to the
right of the Preview button to change this)
- Click on Preview
- When the preview
window opens and displays the preview, click the marquee erase button (top
left icon in marquee box of the preview window) until all previous crop
boxes are erased
- Draw a crop box around
each frame on your film strip
- Try not to include
blank areas of your film or black portions of the MF Film Holderä within the cropped areas. This will help you adjust your
exposure and curve settings later.
- You can switch
between each marquee crop box and make a box active by clicking one time
inside an inactive crop box
- An active crop box
will have “marching ants” around it. The active crop box can be
modified by grabbing one of its edges and dragging it to a new position
- Click on the
“Zoom” button to magnify the view of the active crop. This will help
you to make precise cropping adjustments. Click on the “Preview” icon
to zoom back out an thus view all your cropping selections again.
- You
can manually vary the exposure and curve settings for each cropping
marquee!
- Make just one of
the selection marquees active
- Click on the
histogram and/or tone correction and/or image adjustment buttons. Make
your desired adjustments. Make sure to close the adjustment dialog box
by choosing “Close.”
- Select another
marquee and make any desired adjustments
- When finished
individually adjusting each frame, click the “All” button found in
the preview window to activate all of the marquees
- All the marquees
should be active now and have “ants” (an outline made of dashes) around them
(only one will have “marching ants” though). If you do not have “ants”
around all of your selections, the scanner will not batch scan!
- Click scan to start
the process and watch it do your work for you!
- If you use the
EpsonScan by itself, the files will be saved to disk. If you use it as a
Photoshop plug-in, the files will be transferred to Photoshop’s working
space.
- You can elect to save
these settings (including marquee selections) as a file in “Settings” area.
As long as your MF Film Holderä
and film strips/frames are placed in the exact same position each time
and don’t require exposure adjustments, a set of “saved settings” should
work for multiple sets of film strips. If in doubt, start from scratch with
each film strip.
- To save the
currently selected settings, type a new name in the Settings list box
(if it will let you) and then click the Save button. The option to save
a named file appears to have been deleted with newer versions of
EpsonScan so you must save the settings file under the generic name
EpsonScan offers.
- To apply a saved
setting to scanning, select the name from the list box, and then click
the Preview button. The preview image reflects the settings you have
selected.
- To delete a
setting from the list, select the name and then click the Delete button.
“Silverfast
SE” does not allow
you to click the scan button and then scan multiple marquee selections at one
time into separate files. At the same time, it will let you choose multiple
marquee areas and scan them one after the other which can save you some time.
The basic selection and adjustment procedures are the same those listed below
for Silverfast Ai, but again, you can't do a true batch scan (Silverfast wants
you to upgrade to Ai!).
“Silverfast
Ai” does let you select
multiple marquee areas and then scan them in a batch, so
if you use Silverfast SE you may want to
consider upgrading (info
here). Here is an excellent video tutorial from Vincent Oliver at
Photo-i in regard to batch scans with Silverfast:
Photo-i's Video About
Setting Up a Batch Scan
VueScan
VueScan is a high quality,
third party scanning software program written by Ed Hamrick that now supports
the most Epson®
scanners. Information about this
software and a free trial download can be found at
http://www.hamrick.com/vsm.html.
A few things to keep in
mind when using VueScan in combination with the MF Film Holderä
:
- With VueScan, your
saved input values tell the scanning software to scan the same specific
location each time. Therefore it is imperative that you:
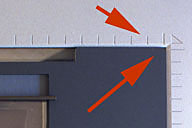
- Place the film
holder on the glass in the same place each time (so make sure you
“nest” it snuggly up in the upper right corner of the scanner bed EACH
TIME)
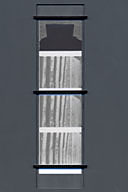
- If you plan to use
a standard set of “X offset” and “Y offset” values instead of manually
drawing a starting crop box each time, you must orient
the film strip itself inside the MF Film Holderä
at the exact same starting position/location each time. In this case, I
suggest aligning the first film frame at the very top end of the film
holding channel area EACH TIME as shown in the image below:
- If your camera has
erratic spacing between image frames (quite common), you will need to
compensate for this behavior. My Mamiya has shown that it can occasionally
vary the spacing by up to 1.5mm. To get around this, I have made the frame
size cropping measurement just a little bit larger than my actual frame
size. This has worked out well for me and I just crop the excess space off
when editing in Photoshop (better to have too much than not enough!).
- VueScan is very
powerful, but it can be daunting to get setup correctly. Correct scanning
exposure across multiple frames when using VueScan may involve extra
steps such as border %, buffer %, exposure lock, film base determination,
etc. This has to do with the particulars of VueScan and not the MF Film
Holderä,
so please refer to your VueScan User’s guide, the “comp.periphs.scanners”
UseNet newsgroup, or Ed Hamrick for help with these issues.
Nobody can explain batch
scanning better than Ed, so if you own this software the first step is to refer
to the “VueScan User's Guide” by Ed
Hamrick which states:
VueScan normally previews or scans
a single frame at a time. If you want to do multiple frames at a time, use the "Input|Batch
scan" option.
You can significantly speed up
batch scanning on some scanners by setting two options so the preview won't be
done when you do a scan. To do this, set the cropping for all the frames, then
clear "Crop|Auto position". In addition, if the "Input|Lock exposure" option is
displayed, turn it on and set "Input|RGB exposure" to either "1" or a value
greater than one that won't overexpose any of the images.
You can batch scan multiple
photos, slides or film strips on a flatbed scanner if you lay them out in a
rectangular grid and use the following procedure: (Also
see my steps listed below which include some extra steps not listed here that
you might forget)
Press the Preview button
Set "Crop|More options" to "All"
Set "Crop|Crop size" to the size
of each image (don't use "Auto")
Move the crop box to the top left
image (hold the shift key)
Set "Crop|X images" to the number
of images across
Set "Crop|Y images" to the number
of images down
Set "Crop|X spacing" to the
distance between the left sides of two images
Set "Crop|Y spacing" to the
distance between the tops of two images
Set "Input|Batch scan" to "All"
Press the Scan button
As an example, here are the
inputs I use to scan a four frame film strip from my Mamiya 645 1000S
camera. Remember:
- These input numbers
will vary based on image size (e.g. 645 vs. 6x9), number of images per strip
(e.g. 6x6 will only have three images), and any variability in the distance
between each image on film strip!
- As stated above, you
must place the MF Film Holderä
in the same spot on the scanner each time and you must place the film strip
in the same starting spot each time.
Individual steps I use for my 645 film strips (which may be different than
yours):
·
Set all other parameters on all
of the tabs besides the “Crop” tab including setting “Batch Scan” to “All” on
the “Input” tab!
- When finished, go to
the “Crop” tab
- On the “Crop” tab, set
your crop units to “mm”
- Press Preview
- Draw your box around
your first film frame
- Make sure to get
this right because all other cropping measurements for the other images
are based on this!
- Hold the “ctrl”
key to move the whole box (if necessary)
- You can also tweak
the box position using the X and Y offset arrows!
- For better
previews and/or if you are using auto exposure settings, try not to
include any blank areas of the film strip or black areas of the MF
Film Holderä
- When you get the
crop box positioned correctly, note the values in the “X offset” and “Y
offset” boxes. As long as you position the holder and film strips in
the exact same position each time, you can just input (repeat) these
settings
- The following values
are then inputted:
"Crop|X
size" 56.5
"Crop|Y
size" 43
"Crop|X
images" 1
"Crop|Y
images" 4
"Crop|X
spacing" Not applicable because you are just scanning
one column of images
"Crop|Y spacing" 50
When you have finally tweaked these settings to your liking, make sure to save
them for future use by going File > Save Options and save them under a new and
appropriate description. Just load these settings/this profile the next time
you want to batch scan a strip of medium format film! (Be warned - if you
update to a different version of VueScan, a settings file created in a previous
version of VueScan may cause errors and not work with the newer version of
VueScan.)
Click
on the following links to go to:
Back to the Page You Were Previously Viewing
Home Page for All Products
E-mail Contact:
scanning@betterscanning.com
All information
contained in this website ©2024 by DSF OmniCorp, LLC and Doug Fisher. This
information may not be reproduced in whole, part or spirit without written
permission.
Patents Pending.
All intellectual property rights reserved.