
Custom Cutting Light Masks for Your Mounting Station
Printable templates are made available to accommodate many film formats as well as "full frame" scanning. We don't precut film masks because users will almost always need their masks custom fitted to match their camera's/ film back's individual and often unique output. Instead, we provide templates and fitted mask material that can be easily cut in a few minutes in order to provide the maximum flexibility to adapt to your specific needs.
Print the appropriate template for your particular film format. Even though the template is in color, PRINT THE TEMPLATE IN BLACK & WHITE. A list of available templates is found at the bottom of this page. (Click Here to Go to the List of 20+ Templates Now)
Notice some film sizes/formats have multiple templates. Often, one template has a slightly larger aperture and will usually encompass the full width of the standard film while the other template listed for the same film size has a slightly smaller aperture and thus will crop your film down closer to the commonly used actual image recorded on the film.
|
|
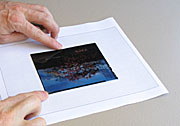
The template files are a general guideline and users can customize the size of the aperture for their specific needs. Place one of your films onto the target. Evaluate whether your specific needs require you to enlarge or shrink the dimensions of the mask. Mark any size adjustments on the template by marking/drawing the exact point of intersection for each of the film's four corners on the printed grid. |
|
|
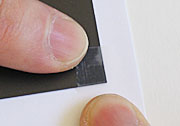
Temporarily tape one of the uncut black plastic masking sheets to the back side of the printed paper template so that it is centered within the outer boundaries/edges of the template. |
|
|
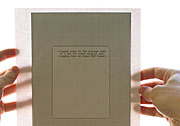
If the template was printed out in black and white as recommended, it is usually possible to just barely see the dark lines of the outer edges of the template for alignment, even when the printed template is turned over. |
|
|
If you cannot see the outline, you can always put the two pieces on a light table, against a window, or near a lamp to assist while you align the masking material to the printed template. |
|
|
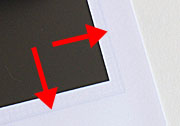
After the two pieces are taped together, flip the them over so that printed template is facing up. Use a pin or thumbtack to push a small hole at the exact intersection for each of the four corners. |
|
|
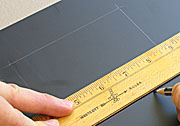
Remove the paper template. Use a straight-edge and pencil to draw a connecting line between the mark/hole at each of the four corners. |
|
|
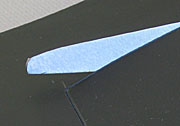
Cut the along the lines in order to create the appropriate aperture in the light mask. While some people will have the skill to use a sharp knife and straight edge to make the cuts, for safety reasons it is advisable to use a sharp pair of small scissors. |
By design, the mask is slightly smaller than the size of the mounting station's glass plate. This allows room to move the mask slightly in any direction in case the film was not mounted to the glass at the perfectly centered position. Users can always trim the outer edges of the mask to make the overall mask even smaller if more maneuvering room for the mask is needed to accommodate film that was not truly centered to the glass during mounting.
Templates for Cutting Light Masks for Your BetterScanning.com Mounting Station
The files listed below require that you have the free software capable of reading .pdf files. If you need this free software to enable your computer to read .pdf files, you can get the FREE Adobe Acrobat Reader at this link: Free Acrobat Reader.
Either click on one of the following links to open the file directly within your browser (assuming you have the Adobe Acrobat plug-in) or "right click" on the file name and do a "save as" to save the file to your hard drive.
Minox Strip
Template for Manual Modification
35 mm Strip - Cropped Close to Actual Useable Image Frame Width
35 mm Strip - Full Film Width Including Edge Markings
Noblex
That Utilizes 35 mm - Tight Crop
Medium Format - Single 645 Frame
Medium Format - Single 6x6 Frame
Medium Format - Single 6x7 Frame
Medium Format - Single 6x9 Frame
Medium Format - Single 6x12 Frame
Noblex That Utilizes 120 Film - Single 120 mm Frame
Medium Format - Single 6x17 Frame
Medium Format Strip - Cropped to Outside Dimensions of the Film (including edge markings)
Medium Format Strip - Cropped Tight (similar to the Epson 120/220 holder's cropping width)
70 mm - Full Width (6x6 starting length)
9 x 12 - Cropped to Image On Film
9 x 12 - Cropped to Outside Dimensions of the Film
4x5 - Cropped to Outside Dimensions of the Film (including notches)
5x7 - Cropped to Outside Dimensions of the Film (including notches)
126 - Single
Frame - Older larger roll film size
Type 55 - Tighter Crop Closer to Useable Image Area
Type 55 - Cropped Close to Full Outside Dimensions of the Film
Polaroid 665 - Cropped to Outside Dimensions of the Film (including edge markings)
Back to the Page You Were Previously
Viewing
These Flags Represent Some of the Places Where Our
Product Owners are Located Worldwide!!!
![]()
For More Information, e-mail us at: scanning@betterscanning.com
All information contained in this website ©2024 by DSF OmniCorp, LLC and Doug Fisher. This information may not be reproduced in whole, part or spirit without written permission.
Patents Pending. All intellectual property rights reserved.