Dry Mounting With the
BetterScanning.com
Mounting Station
(requires
the optional version of the mounting station
that includes anti-Newton glass)
Some people do not believe fluid mounting is worth the required extra time, effort and cleanup. For these people, and for films where no dedicated holder is available, dry mounting is an alternative. Dry mounting works well with the undermounting concept in particular because the glass is positioned on the backside of the film and thus rests between the film and the scanning lamp (a big source of heat that can warp film). Therefore, the anti-Newton Ring glass acts as a "heat shield" to help absorb and hold a good amount of the lamp's heat before it can reach the film.
Note: The ICE function available on some scanner models often does not work well with dry mounting to anti-Newton Ring glass and will need to be turned OFF if you see a "stained glass" effect with your scans.
Use a tape type that will not leave a residue on your film. I really like 3M’s “Magic Tape® (it is also marketed as their “invisible” matte tape) because it works well with its very high adhesion but it doesn't usually leave a residue. It can be bought at most any decent office supply store, Target, Wal-Mart, etc. Spend the extra few cents and buy the genuine high quality 3M product!!! TIP: Precut a number of tape pieces because you want to mount all of the film corners in succession.
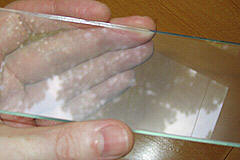
Dry mounting is accomplished by taping the film to the finely etched surface of the (optional) anti-Newton Ring glass. (NOTE: this is the different compared to fluid mounting!) The anti-Newton Ring surface can be determined by comparing the reflection characteristics of the two sides of the glass.
|
|
This first image shows the un-etched side of a smaller piece of ANR glass. Notice the glare and the sharp/well defined reflection of the tree and sky. You DO NOT want to attach your film to this glossy side of the glass when dry mounting. |
|
|
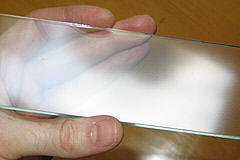
This second image shows the etched side of the same smaller piece of ANR glass. It is actually reflecting part of the same scene as seen above. However, please notice there are no defined shapes in this reflection. In practical terms, you cannot distinguish the reflection of the tree. Tape your film to this dull/etched side of the insert when dry mounting! |
|
|
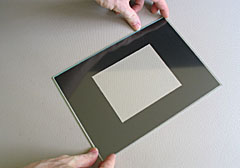
Using a clean and flat work surface, place the appropriate light mask down on to your work surface. Now center the glass plate on top of the light mask with the etched ANR surface facing up toward you. The light mask will serve as an aid to make sure you place your film in the correct centered position on the glass. The light mask will be slightly smaller than the glass plate, so try to keep an equal gap around all the outer edges. |
|
|
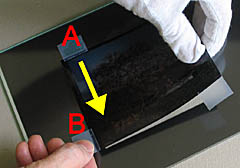
The key technique is to tape the film in a manner so that tension is created across the film in order to hold the film flat against the glass. Start by pre-attaching a piece of tape to each corner of the film. Longer pieces of tape have more area to "grip" the thin edges along the sides of the film, so make sure to use pieces of tape that are long enough to get a good grip (especially if you are dealing with a super-thin edge/black border). |
|
|
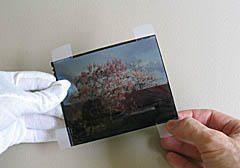
Align your film so that it is correctly positioned over the aperture in the film mask below (double check to make sure the glass and mask have not shifted out of position) and attach the first corner "A" to the glass. Make sure the film is really secured at corner "A" and put moderate tension on corner "B" in the direction of the arrow while you attach "B" to the glass. Notice how the free gloved hand is used to ensure the other end of the film stays raised off the glass and does not prematurely stick to the glass. Once "B" is taped is down on the glass, recheck to be sure it is firmly adhered to the glass. |
|
|
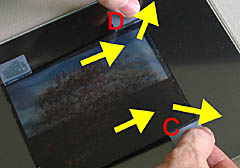
Now simultaneously pull/create a moderate tension on corners "C" and "D" in the long direction AS WELL AS a slightly outward angled direction (see arrows) at each corner and then attach the tape to the glass. |
|
|
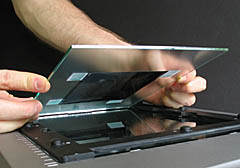
The mounting station's frame should already be positioned on the scanner itself. Insert the mounted glass plate face down into frame. The film should now be on the underneath side of the glass and thus facing the scanner's glass and optics. |
|
|
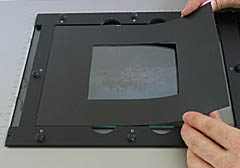
Place the light mask you have custom cut from the supplied sheets down on to the back side of the glass. Make sure to position the mask so that it doesn't crop any part of your image and leaves equal borders around the image if there is any gap. If there is a gap between the mask and the image, be aware you might get some flare at the edge of your image and then also probably cannot rely on the software's auto cropping or auto determination of the best "exposure" settings. Manually crop the image down to the final image area (instructions found here: Tips). Users can always trim the outer edges of the mask to make the overall mask even smaller if more maneuvering room for the mask is needed to accommodate film that was not truly centered to the glass during mounting. |
Important: Remember to make sure your software uses the "Film with Film Holder" setting in the scanning software (DO NOT use "Film with Film Area Guide").
Finally, recheck to make sure the frame has not moved on the scanner bed and is still positioned against both the top and right edges of the scanner bed.
Back to the Page You Were Previously
Viewing
These Flags Represent Some of the Places Where Our
Product Owners are Located Worldwide!!!
![]()
For More Information, e-mail us at: scanning@betterscanning.com
All information contained in this website ©2026 by DSF OmniCorp, LLC and Doug Fisher. This information may not be reproduced in whole, part or spirit without written permission.
Patents Pending. All intellectual property rights reserved.