Adapting Your Current Fluid Mounting Workflow to
the
BetterScanning Mounting Station
Warning: Fluid mounting can involve the use of chemicals which are hazardous to your health and/or may (rarely) be incompatible with certain film types. Additionally, some mounting fluids are flammable. Therefore, for liability reasons we do not sell mounting fluid itself and do not want advise or take any responsibility in regard to its use (Epson will not do this either). We sell a tool that can be adapted for use with or without mounting fluid and that should only be used with mounting fluid by people who already fully understand the process and its potential dangers. It is your responsibility to educate yourself in regard to the use and potential dangers of fluid mounting. Read and follow your mounting fluid manufacturer's instructions, warnings and safety precautions.
If you want information on fluid mounting in general and some general fluid mounting tutorials, visit the fluid mounting resource page found here: Fluid Mounting Resources. If you need help putting together a kit of fluid mountings supplies very economically, read our ideas for economical supplies at: www.betterscanning.com/scanning/cheapfluidmounting.html.
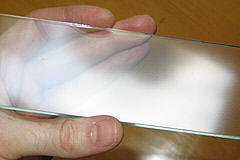
Please Note: During the fluid mounting process, mounting stations with the optional ANR glass plate should start with the glass plate oriented so the etched (dull) surface is facing down toward the work surface and light mask. The glossy side should be facing upward and is the side to which you fluid mount.
|
|
This first image shows the etched side of a small piece of ANR glass. It is actually reflecting part of the same scene as seen below. However, please notice there are no defined shapes in this reflection. In practical terms, you cannot distinguish the reflection of the tree. DO NOT mount your film to this dull/etched side of the insert when fluid mounting! |
|
|
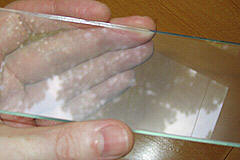
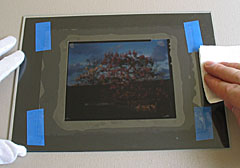
This second image shows the un-etched/glossy side of the same small piece of ANR glass. Notice the glare and the sharp/well defined reflection of the tree and sky. Always mount to the glossy/smoothest glass surface when fluid mounting. |
|
|
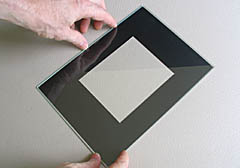
Using a clean and flat work surface, place the appropriate light mask you have already custom cut from the supplied sheets down on to your work surface. Now center the glass plate on top of the light mask (if you have the optional ANR glass, the glossy side should be facing up and the anti-Newton Ring surface should be facing down toward your work surface). The light mask will serve as an aid to make sure you place your film in the correct centered position on the glass. The light mask will be slightly smaller than the glass plate, so try to keep an equal gap around all the edges. |
|
|
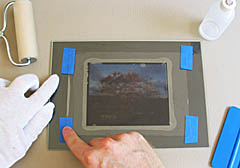
Use your current preferred method to fluid mount your film to the glass plate and remember to keep it centered on the glass. For demonstration purposes, the picture at the left shows the common glass-fluid-film-fluid-Mylar layer method for mounting film. Unfortunately, due to liability issues, actual mounting instructions must be provided by the manufacturer of your mounting fluid or obtained on your own from the tutorial websites like those noted on the Fluid Mounting Resources page. |
|
|
One thing to note is the need to keep the Mylar clean before mounting, during mounting and during the squeegee process. Wipe up any excess mounting fluid around the outer edges of the Mylar overlay before you start rolling out air bubbles. Do not roll your roller out past the edge of the Mylar overlay where it could pick up any fluid that seeps out! Wipe your roller clean EVERY TIME before you put it back down on to the overlay to roll out more air bubbles. |
|
|
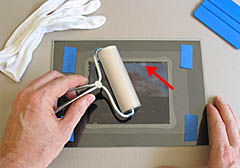
Make sure to squeegee any air bubbles out toward the edges of the glass plate (see arrow). Remember, you are just concerned about the image area itself. You will have bubbles at the edge of the film, but this is to be expected. Use an absorbent and lint-free towel to remove any excess fluid. The concept is to do this now while the plate is still on a safe work surface and thus while it is away from the scanner. This method minimizes the chance of excess fluid being transferred onto the film scanner where it could possibly damage the scanner. |
|
|
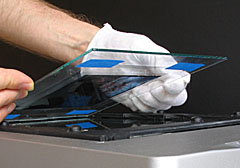
After the film has been correctly mounted to the glass plate and any excess fluid has been cleaned away, insert the mounted glass plate face down into the mounting station's frame (which should already be positioned on the scanner itself). The film should now be on the underneath side of the glass and thus facing the scanner's glass and optics. |
|
|
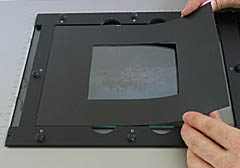
Place the light mask you have custom cut from the supplied sheets down on to the back side of the glass. Make sure to position the mask so that it doesn't crop any part of your image and leaves equal borders around the image if there is any gap. If there is a gap between the mask and the image, be aware you might get some flare at the edge of your image and then also probably cannot rely on the software's auto cropping or auto determination of the best "exposure" settings. Manually crop the image down to the final image area (instructions found here: Tips). Users can always trim the outer edges of the mask to make the overall mask even smaller if more maneuvering room for the mask is needed to accommodate film that was not truly centered to the glass during mounting. |
Important: Remember to make sure your software uses the "Film with Film Holder" setting in the scanning software (DO NOT use "Film with Film Area Guide").
Finally, recheck to make sure the frame has not moved on the scanner bed and is still positioned against both the top and right edges of the scanner bed.
Back to the Page You Were Previously
Viewing
These Flags Represent Some of the Places Where Our
Product Owners are Located Worldwide!!!
![]()
For More Information, e-mail us at: scanning@betterscanning.com
All information contained in this website ©2024 by DSF OmniCorp, LLC and Doug Fisher. This information may not be reproduced in whole, part or spirit without written permission.
Patents Pending. All intellectual property rights reserved.